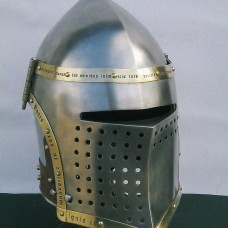
Medieval helmet bascinet has appeared early XIV century. There was a lot of types of such helmet. They were differ in dome’s shape, type and way of visor attaching. For example, late Italian bascinets had almost straight back side. Frontal attaching of visor was called “klappvisor” and it was typical for German bascinets.
In this article, we’d like to tell you, how our crafstman makes a bascinet with curved visor, typical for the middle of the XIV century.
1. The first and the most important thing is to take measurements over the head. If you don’t plan to install liner, take measures over the liner or padded cap, on which you’ll wear the helmet.
2. Make line pattern according to the taken parameters. Transfer pattern on the leaf and cut on the line pattern.
3. Now we have cutouts. Hammer out semi-spheres for our bascint with 1 kg sledge. To speed up the process of dome making, we use argon torch. At work, always remember the safety instructions: when cutting the metal, use safety glass, gloves, duck bib overalls or hoover apron.
4. The next task is to even the helmet’s hem and fit two halves before welding.
5. Welding process.
Weld two halves with argon torch and leave the dome to cool down. Do the frst flattering with beakiron. Later, this procedure will allow us to spend less time for the main polishing.
6. Now, let’s make our visor. Unbend nose part and curve work-pieces a little. Frame it with argon torch and fit to the dome.
After we’ve welded a visor, we proceed with an over-nose “platform”. It is very important not to make it too close to your face. Be sure, that it doesn’t touch your nose or bridge, in other case you may get hurt!
7. Depending on the type of attaching system for visor, we make hinges or side pins and install it to the visor. After that, attach visor to the helmet by drilling a hole and fixing with small bolt.
8. Mark and drill holes for liner’s sewing. We use twist drill of 3 mm diameter for such holes. With twist drill of 6-8 mm, make holes for breathing on the visor. At this stage, we also make and install button for visor fixation.
9. Helmet is ready for polishing.
10. Crafting of brass strips with etching. Make line pattern and cut out brass strips of 1.5-2 cm width. For preliminary fit check, install them with small bolts on the visor’s edge.
Remove the strips and start to etch. Here you can see an example of text layout and how it’s placed on the strips. The most inportant thing! If you’ll write phrases/text on foreign language, don’t be lazy and check the correctness of spelling (better with native-speaker, if it is not Latin:), so in the future you’ll be not put to shame:)
11. Polish the helmet with abrasive discs.
12. Final assembling. All parts of helmet are ready and we just need to recompose them as a constructor.
Try to have a perfect mood when you do such work, then you’ll enjoy all the process and results!
And if it's not work out you can buy helmet from us :)


0 Kommentare
Steel-mastery.com